Lecture 3
Making Form: Using Texture and Value to Communicate Space
Submission Details
This exercise will be included in your Assignment 1 submission.
Videos to Watch
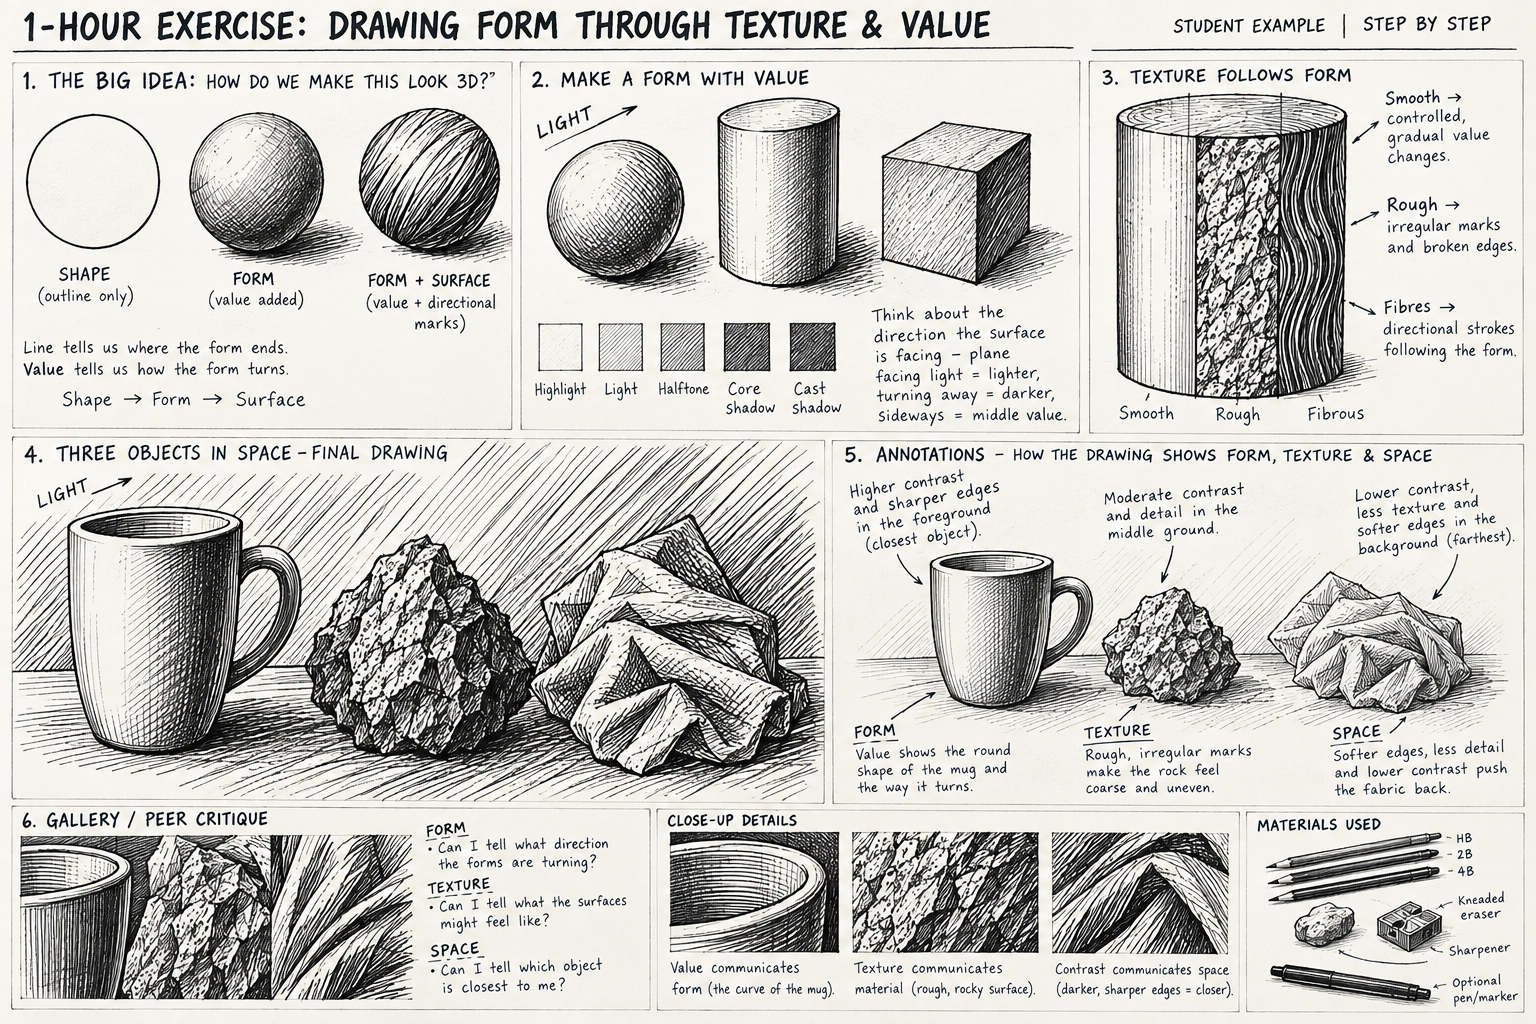
1-Hour Exercise: Drawing Form Through Texture & Value
A first-year friendly lesson using simple objects so students can focus on the principles rather than anatomy.
Learning Objective
By the end of the class, students will be able to:
- Use value to make a flat shape appear three-dimensional.
- Use directional marks to describe the surface of a form.
- Use texture to communicate different materials.
- Use contrast and detail to make forms appear closer or farther away.
- Explain how their marks communicate form, material, and space.
Materials
- 9 × 12" or 11 × 14" drawing paper
- HB, 2B and 4B pencils
- Kneaded eraser
- Sharpener
- Optional: black marker/pen
- A simple still-life arrangement with 3 objects (one smooth, one textured, one irregular)
Lesson Plan
The Big Idea: "How do we make this look 3D?"
- Draw a circle and ask if it looks like a sphere.
- Add a light-to-dark value transition to reveal the form.
- Line tells us where the form ends. Value tells us how the form turns.
- Draw the same sphere three ways: outline only (shape), value added (form), value + directional marks (form + surface).
- Introduce the hierarchy: Shape → Form → Surface.
Exercise 1: Make a Form With Value
- Draw three simple forms: sphere, cylinder, box.
- Establish a light source with a small arrow: "LIGHT →".
- Identify highlight, light, halftone, core shadow, and cast shadow.
- Don't blend everything immediately — ask "What direction is this surface facing?"
- Plane facing light → lighter, turning away → darker, sideways → middle value.
Exercise 2: Texture Follows Form
- Demonstrate three surfaces on a cylinder: smooth, rough, hair/fibres.
- Smooth → controlled, gradual value changes. Rough → irregular marks and broken edges. Fibres → directional strokes following the form.
- Divide one simple form into three sections: Smooth | Rough | Fibrous.
- Create three surface qualities without changing the underlying form.
- Texture = marks that describe the surface, not random little marks.
Main Exercise: "Three Objects in Space"
- Object A — Smooth (mug, bottle, ball). Object B — Rough (rock, crumpled paper, wood). Object C — Textured/irregular (fabric, plant, sponge, shoe).
- Make a 20-minute observational drawing following five rules: establish big shapes, identify light source, use value for form, use texture selectively, use detail for space.
- Foreground: more contrast, more texture, sharper edges, more detail.
- Middle ground: moderate contrast and detail.
- Background: less contrast, less texture, softer edges.
Gallery / Peer Critique
- FORM — Can I tell what direction the forms are turning?
- TEXTURE — Can I tell what the surfaces might feel like?
- SPACE — Can I tell which object is closest to me?
- Point to one place where value communicates form.
- Point to one place where texture communicates material, and one where contrast communicates space.
The peer critique makes the vocabulary functional rather than something students simply memorize — every term should point back to a mark on the page.
Student Example: Step by Step
Do not copy this example. Find your own REAL 3D objects and draw those. You may use an apple, ball, melon, shirt, towel, napkin, rock, ball of string, toy, etc.
Shading Techniques
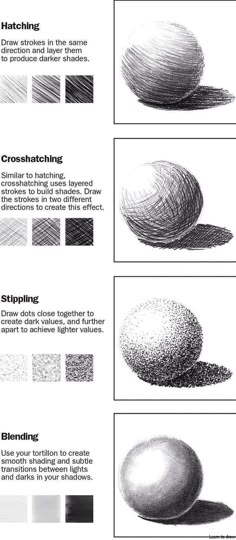
Four ways to build value and texture: hatching (parallel strokes layered for darker shades), crosshatching (layered strokes in two directions), stippling (dots spaced close for dark values, farther apart for light), and blending (use a tortillon for smooth transitions between lights and darks).